In this session of ASP.NET Core, we will discuss about Custom HTML Helper and create a Custom HTML Helper and use the created helper inside our Views. Also, we continue our discussion in Session 36 about changing properties format in Edit View. But in this session, we use DisplayFormat instead of EditorTemplates for achieving this purpose.
Change Properties Format with DisplayFormat in Edit Mode
During Session 36, we use EditorTemplates for applying our required changes on the Model properties in Edit mode. Also, in Session 33 we use Data Annotation (DisplayFormat) for changing properties format on View mode. In this session we try to change Model Properties in Edit mode with DisplayFormat. Thus, we add this attribute to the Model which is bound to the View that used EditorForModel Html Helper same as session33. Then, we set ApplyFormatInEditMode option to True, to be applied on the View on Edit mode.
For instance, in our project we want to change DateTime format of Edit View with above mentioned technique. Thus, we add this attribute on Cost Model and set ApplyFormatInEditMode option to True.
|
1 2 3 4 5 6 7 8 9 10 11 12 13 14 15 |
public class Cost { [HiddenInput(DisplayValue =false)] public int ID { get; set; } public decimal Amount { get; set; } [DisplayFormat(DataFormatString = "{0:dd/MM/yyyy}", ApplyFormatInEditMode = true)] public DateTime Date { get; set; } public string Comment { get; set; } public string Category { get; set; } public int PaymentMethod { set; get; } } |
Just bear in mind, in previous session we made this change via EditorTemplates. Thus we should change DateTime.cshtml file in Views/Shared/EditorTemplates as shown below.
|
1 2 3 4 5 6 |
@model DateTime @Html.TextBox("", ViewData.TemplateInfo.FormattedModelValue) |
Create Custom HTML Helper
There is no predefined HTML class extension available for image tag. Thus, for loading an image inside our Views, we should use <img></img> tag or we can create a Custom Html Helper for this purpose.
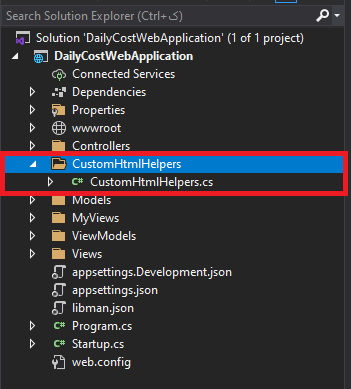
Hence, for above mentioned target, we can create a folder in root of our project with name of “CustomHtmlHelper” or anything else that you prefer. Then, create a class inside the newly created folder with name of “CustomHtmlHelpers.cs” or anything that you wish. Just, remember that, both class and method inside mentioned class should be Static.
Next, we need to create a method with result of TagBuilder and use input parameters to set the required attribute of the Html tag. In this project, as we decided to create a Custom Html Helper for <img><img/> tag, we need to set “src”, “alt” and “class” attribute as well. Later, we can set above mentioned attribute with attribute.add method.
|
1 2 3 4 5 6 7 8 9 10 11 12 13 14 15 16 17 18 19 20 |
using Microsoft.AspNetCore.Mvc.Rendering; namespace DailyCostWebApplication.CustomHtmlHelpers { public static class CustomHtmlHelpers { public static TagBuilder Image(this IHtmlHelper htmlHelper, string src, string alt, string klass) { TagBuilder tb = new("img"); tb.Attributes.Add("src", src); tb.Attributes.Add("alt", alt); tb.Attributes.Add("class", klass); return tb; } } } |
For using TagBuilder in the above class, we must add Microsoft.AspNetCore.Mvc.Rendering namespace to the class.
Lunch Custom Html Helper in Views
We can use Custom Html Helper in the Views same as the built-in one. Just for this purpose, we need to add the created Helper namespace to the View.
In our practice project, we decided to add image to our cost data, thus we add two more properties to Cost Model to handle the data of photo path and Alt Text.
|
1 2 3 4 5 6 7 8 9 10 11 12 13 14 15 16 17 |
public class Cost { [HiddenInput(DisplayValue =false)] public int ID { get; set; } public decimal Amount { get; set; } [DisplayFormat(DataFormatString = "{0:dd/MM/yyyy}", ApplyFormatInEditMode = true)] public DateTime Date { get; set; } public string Comment { get; set; } public string Category { get; set; } public int PaymentMethod { set; get; } public string PhotoPath { get; set; } public string AltText { get; set; } } |
Then we use these two properties to render the image inside the View.
|
1 2 3 4 5 6 7 8 9 10 11 12 13 14 15 16 17 18 19 20 21 22 23 24 25 26 |
@using DailyCostWebApplication.CustomHtmlHelpers @model CostDetailViewModel @{ ViewBag.Title = "Cost Detail"; } <div class="row"> <div class="col-lg-4 offset-lg-4 col-md-6 offset-md-3 col-12"> <div class="card"> <div class="card-header"> @Model.PageTitle </div> @Html.Image(@Model.CostData.PhotoPath, @Model.CostData.AltText, "card-img-top") <div class="card-body"> <p class="card-text">ID: @Model.CostData.ID</p> <p class="card-text">Amount: @Model.CostData.Amount</p> <p class="card-text">Category: @Model.CostData.Category</p> <p class="card-text">Comment: @Model.CostData.Comment</p> <a href="#" class="btn btn-primary">Cost List</a> </div> </div> </div> </div> |
As you can see, in above piece of code, we add required namespace then we call the HTML Helper extension.
If you need more details, watch this session video. Also, for being updated about our coming sessions, follow us on Instagram, Facebook, Telegram or YouTube. Also you can have access to list of all sessions HERE.
You can download this Session Slides form HERE


